Mediterranean Cauliflower Rice

mediterranean-cauliflower-rice-recipe

Happy Tuesday! Alright, who has difficulties coming up with packable lunches for work? For me, the struggle is real. And it’s a weekly struggle. I really hate to buy lunch at work — I find it to be overpriced and usually, not as healthy as I would like. But, I find myself getting into a real rut when it comes to thinking of new lunch ideas and once I do have a plan, I get bored with the same thing each day. Can anyone else relate??

For those of you like me out there, I have a new, quick and healthy recipe to add to your lunch rotation. The best part of this recipe is that it can be made over the weekend and divided into containers for the entire work week. There is no excuse to buy your lunch when it’s packed and ready to go as of Sunday night! Although I made this recipe with lunch in mind, it would also be amazing as a side dish with grilled meat, especially as we head into the warmer months!
mediterranean-cauliflower-lunch

healthy-lunch-ideas

cauliflower-rice

how-to-make-cauliflower-rice
Have you tried cauliflower rice yet {see picture above}? I have been reading so much about it that I decided I needed to come up with a recipe that could feature it. I’m a huge fan of cauliflower {see this cauliflower pizza recipe I made last year here}, so this recipe is right up my alley. But I can honestly say, cauliflower rice doesn’t really even taste like cauliflower — it is diced so fine that it has the texture of a couscous and really takes on the flavors of whatever dressing you use. So, if you aren’t a huge fan of cauliflower, you should definitely give it a try!

I had this packed in my lunch yesterday and I have to admit, it was absolutely amazing. I was actually kicking myself for not packing more {I made up for it in today’s lunch haha!} I am hoping to share more recipes like this with you as we head into summer because I know this is something I struggle with on a daily basis and I am constantly looking for lunch inspiration… and I feel like I’m not alone! Also stay tuned for quick and healthy weeknight dinners coming to ABM soon — this is also a struggle of mine! 

cauliflower-rice-recipe

packed-lunch-ideas

healthy-packed-lunches

healthy-cauliflower-rice-recipe

Mediterranean Cauliflower Rice


{what you’ll need}

1 medium-sized head of cauliflower, cut into florets
1 pint cherry or grape tomatoes, halved
1 cucumber, diced
1/4-1/2 of small red onion, diced 
{more or less depending on your preference}
5 ounces crumbled feta cheese
1/2 cup parsley, roughly chopped
Juice of 1 lemon
1/4 cup olive oil, plus 2-4 tablespoons

{directions}
Place the cauliflower florets in a food processor in a single layer, working in batches {you don’t want to over-stuff the food processor with cauliflower because some of the cauliflower could become watery}. Pulse in quick intervals to achieve a fine, couscous- or rice-like texture; transfer to a separate bowl. Once you have finished the cauliflower florets, heat 1-2 tablespoon of olive oil in a large skillet over medium heat. Add the cauliflower rice to the skillet and cook for about 4 minutes, until there is no oil remaining and the rice is slightly soft {I worked in two batches for this as well, just so the skillet wasn’t overcrowded}. Transfer the cooked rice to a large, clean bowl and allow to cool to room temperature. Add the tomatoes, cucumber, red onion and feta cheese to the rice and stir gently to combine. Toss with the 1/4 cup of olive and juice of 1 lemon. Add the parsley and carefully mix until all the ingredients are fully combined. Season with salt and pepper and serve. **If making ahead for packed lunches, divide into containers and refrigerate until ready to eat. 


Print Recipe HERE

….

Thanks for dropping by and have a great day!

Peanut Butter Easter Eggs

peanut-butter-easter-eggs

Happy Tuesday! Can you believe Easter is this weekend already?! I always loved celebrating Easter growing up and I’m so excited that this year, Easter falls on Ella’s 4th birthday! Needless to say, there will be a lot of celebrating this weekend 🙂

I’ve never really been a huge candy fan, even as a child. But, there was always one candy that caused serious excitement when looking through my Easter basket on Easter morning: peanut butter eggs. It’s no secret that I love peanut butter. I have peanut butter pretty much everyday with breakfast and it’s basically something I couldn’t live without. Do you know when people ask you what you would take with you on a deserted island if you only had X amount of things? I think I definitely would have to figure out a way to incorporate peanut butter into my short list of things! 

Anyways, there is just something so delicious about that creamy peanut butter with the chocolate shell. And, it maybe strange, but I love the peanut butter eggs that are available only at Easter SO much more than a regular Reese’s peanut butter cup. Does anyone else agree??

My version of the peanut butter eggs is super easy and would be so fun to decorate with your kids — especially if you are looking for something to do this week on spring break! I picked up these {edible} candy decorations at a craft store, but you could always check a local bakery, too. I stuck with the spring and Easter theme and went with the different colored flowers and the cute little birds, but it’s up to you on decorations!

I wanted you to see the inside of one of the eggs {see below} so I did cut one in half — which was the perfect excuse to give it a try. Let’s just say these need to be put in the freezer or hidden far, far away because chances are, I will eat them all if they are anywhere near me!
how-to-make-homemade-peanut-butter-eggs

reese's-peanut-butter-cups

reese's-peanut-butter-easter-eggs

reese's-peanut-butter-eggs-recipe

how-to-make-homemade-reese's-peanut-butter-cups

wilton-decorative-candies

chocolate-covered-peanut-butter-recipe

homemade-peanut-butter-easter-eggs-recipe

decorated-chocolate-covered-easter-eggs

peanut-butter-eggs-recipe


Homemade Peanut Butter Easter Eggs


{what you will need}
2 cups peanut butter 
1/4 cup butter, at room temperature
16 ounces powdered sugar
12 ounce bag semisweet chocolate morsels
1 1/2 tablespoon shortening 
Decorative candies, if desired

{directions}
In a mixer, combine the peanut butter, butter and powdered sugar until you reach a smooth consistency. Line a baking sheet with wax paper. Form peanut butter mixture into an egg shape {I used about 2 tablespoons of mixture to form the eggs} and place them on the baking sheet. Transfer baking sheet to the freezer for 1 hour to allow the eggs to set. Using the double boiler, melt the chocolate and shortening together until smooth. Remove the peanut butter eggs from the freezer. Carefully cover the egg in chocolate {I used this candy dipping tool and ladled the chocolate over the egg to cover the top completely} and transfer chocolate covered egg to clean wax paper. Add any decorations that you desire at this point while the chocolate is still wet. Allow the chocolate to harden in the freezer before serving. Makes about 20 peanut butter eggs. 


….

Thanks for stopping by and happy cooking!

Cheeseburger Pizza

cheeseburger pizza recipe
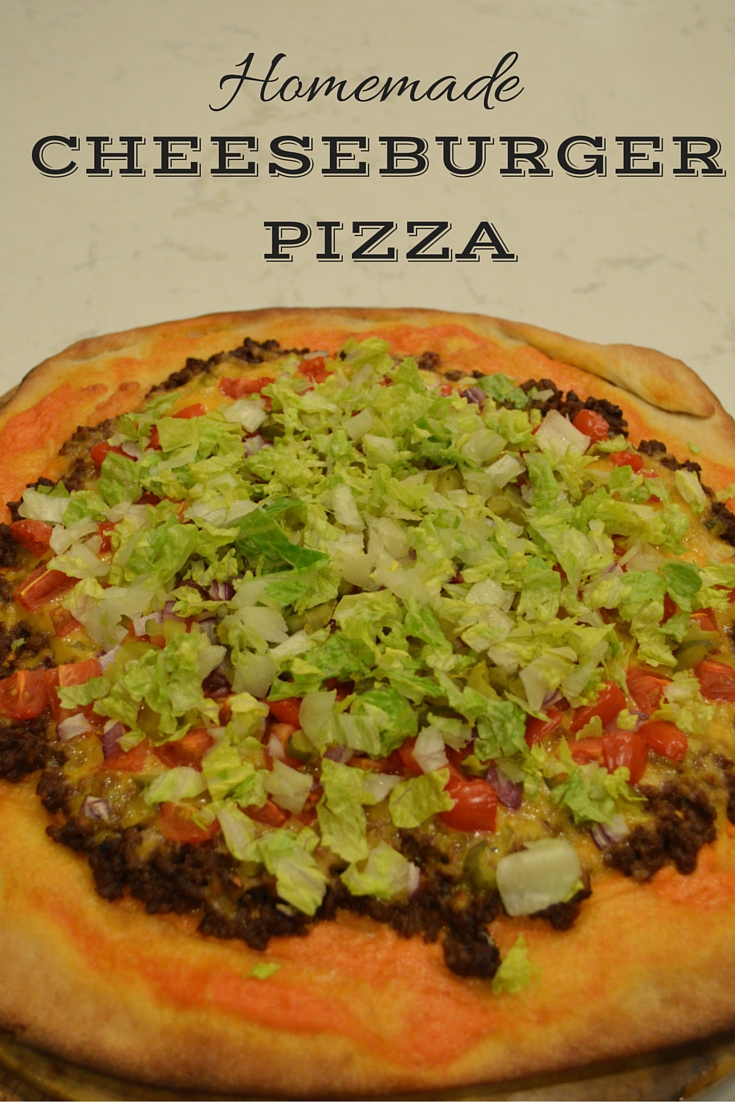
I know I am normally all about the healthier recipes, but I couldn’t resist sharing this delicious, and not so healthy, pizza recipe with you! For those of you who have been following along for awhile, you know Friday night is pizza night in our house. I love experimenting with different ingredients for fun, new pizzas {Two of my all-time favorite are here {just made this Friday night!} and here {my husband’s favorite combination}.
I’m not a huge meat person but I do love a good burger — I know, crazy right?! I don’t cook meat too often at home truthfully because I don’t like handling it, but I know how much my husband loves it so I do try to make it occasionally. I started experimenting with the idea of a cheeseburger pizza at the end of last year {if you follow me on Snapchat {rach.mccarthy7} you may remember seeing a few pictures of it!}. But, I wanted to make it a few times to get the recipe down before I shared it with all of you! And, let me just say, this pizza is AMAZING. It literally tastes like you are eating a burger. I feel like I am pretty well-versed when it comes to pizza making and I think this might be my favorite one yet — says the almost vegetarian 🙂
Like with many of my recipes, you can totally customize this to how you would create your own burger. Although I would never want pickles on a burger, I did add them to the pizza and it gave the entire pizza an amazing flavor!
cheeseburger-pizza-ingredients
cheeseburger-pizzacheeseburger-pizza-recipecheeseburger-pizza-saucecheeseburger-pizza-sauceground-beef-pizza-recipeground-beef-pizzacheeseburger-pizzaeasy-pizza-recipesbest-homemade-pizza-recipecheeseburger-pizza-recipecheeseburger-pizza-dinner-ideasweeknight-dinner-ideaseasy-pizza-recipes


Cheeseburger Pizza


{what you will need}

1 pound ground beef {I used 90/10}
2 tablespoons + 1/3 cup ketchup
2 tablespoons low fat mayo
1 teaspoon yellow mustard
1 tablespoon Dijon mustard
2 tablespoons barbecue sauce
1/2 cup shredded cheddar cheese
1 pint grape tomatoes, chopped
1/4 small red onion, chopped
1/3 cup hamburger dill pickles, chopped
1/3 cup shredded lettuce
Store-bought pizza dough
 
{directions}
Preheat oven to 425 degrees. Begin by browning the ground beef over medium heat until it is cooked through and no longer pink. Reduce the heat to low and add 1/3 cup ketchup, yellow and Dijon mustards and the barbecue sauce. Mix to combine completely and set aside. In a small bowl, mix the remaining ketchup {2 tablespoons} with the mayo to create the pizza’s “sauce”. Place the pizza dough onto a pizza stone or pan and spread the ketchup and mayo mixture over the dough. Add the ground beef on top of the sauce and continue with the remaining toppings: cheddar cheese, tomatoes, red onion and pickles. Transfer to the oven and bake for 10-15 minutes or until the crust is golden brown. Remove the pizza from the oven and top with the shredded lettuce. Allow to sit for a few minutes before cutting and serving. Enjoy! 
 
….
 
Thanks for dropping by and happy cooking!

Rosemary Focaccia Bread

rosemary-focaccia-bread-recipe

 I don’t think I am alone in saying that sometimes I find recipes to be intimidating. But, when you give a challenging recipe a try and it turns out perfect, isn’t it the most amazing feeling?! I recently conquered my fear of homemade gnocchi {you can see the post here}, but, up until now, I have found homemade bread to be so intimidating! As much as I love bread {and let me tell you, I love it way too much!} I haven’t really made it that often, mostly because of time. I am more of a quick recipe kind of girl and all that resting, waiting, kneading…I just don’t have the patience for that! 


Over Christmas, my mom told me she found a recipe for rosemary focaccia bread in one of her Southern Living Cookbooks and had wanted to give it a try. Focaccia bread is one of my favorites, and add rosemary in and I’m sold! I thought this would be a great chance to review a different kind of bread recipe with you and let you know how it went. And, let me just say, it went fabulously! I would highly recommend this Southern Living recipe — it was relatively quick for homemade bread and the added rosemary made for the most amazing flavor. The only suggestion I would have is to use one pan instead of the two that the Southern Living recipe suggests. We used the two pans and I found the bread to be a little too thin for my taste.

Although, since we used the two pans, we ended up with two flatbreads…meaning I still have one in the freezer! Without any problems to report, I would definitely give this recipe a try again. Have you ever made homemade bread? What kind is your favorite? I would love to hear in the comments section below!

rosemary-focaccia-bread
how-to-make-homemade-bread

homemade-rosemary-bread

how-to-make-focaccia-breadrosemary-focaccia-bread
**recipe adapted from Southern Living Christmas Cookbook**

Rosemary Focaccia Bread

{what you will need}
2 envelopes active dry yeast
2 cups warm water
6 cups all-purpose flour, divided
1/2 cup unsalted butter, softened 
1/2 cup finely chopped fresh rosemary, divided
1 teaspoon salt
1/4 cup olive oil, divided
2 1/2 teaspoons kosher salt
1/2 teaspoon ground pepper

{directions}
Preheat oven to 375 degrees. Combine the yeast and warm water in a 4-cup glass measuring cup; let stand 5 minutes. Place 5 cups flour in a large bowl, making a well in the center. Add the yeast mixture and stir until a soft dough forms. Cover and allow the dough to rise in a warm place for 45 minutes or until doubled in size. The dough will be super spongy. Sprinkle the remaining 1 cup flour on a flat surface. Turn the dough out onto the floured surface and knead until the flour is incorporated to make a firm dough. Gradually knead in the butter, 1/4 cup rosemary and 1 teaspoon salt. Knead until the dough is smooth and elastic, about 9 minutes, adding additional flour if necessary. Brush 2 {or if you would like the bread to be thicker, 1} jellyroll pans with 1 tablespoon olive oil. Divide the dough in half and press dough into the pan. Cover and allow the dough to rise in a warm place for 30 to 45 minutes or until the dough has almost doubled in size. Using your fingertips, dimple the dough all over and sprinkle with remaining 1/4 cup rosemary. Drizzle the remaining 2 tablespoons olive oil and sprinkle with the kosher salt and ground pepper. {The recipe calls for adding minced garlic at this point as well, but I skipped that.} Bake for 25-30 minutes or until golden brown. Cut or tear into squares or triangles. 

Thanks for stopping by and have a great Tuesday! See you back here tomorrow for an all new Wednesday Wishes!

St. Patrick’s Day Thin Mint Truffles

thin-mint-truffles

Well hello March! I can’t believe we are already in the third month of the year. Time is really flying! Since it is the beginning of March, I thought it would be fun to kick of the new month with a yummy and fun St. Patrick’s Day treat. Nothing says St. Patrick’s Day more than the color green and thin mint cookies!

As you may know, it’s that time of year again where we see all the little Girl Scouts out selling cookies. I know I always feel obligated to buy something, so this recipe is a great excuse to help the Girl Scouts and make a delicious treat that’s perfect for kids and/or co-workers {and so you don’t eat the entire box yourself!} If you can’t find Girl Scout cookies in your area or you would like to make these when they aren’t selling cookies, you could easily replace the thin mint cookies for these or these ðŸ™‚

Although I am calling them truffles, they are super simple, just a few ingredients and no bake…they just look like truffles, right?! I love the idea of this quick cookie because you could definitely use any other kind of cookie and change up the chocolate or decorations to make it your own. And, they look much more complicated than they really are!
thin-mint-cookie-ideas

Thin Mint Truffles


{what you will need}

1 box Thin Mint Girl Scout Cookies
8 ounces cream cheese, softened {I used low fat}
8 ounces white chocolate baking bars
12 ounces white chocolate morsels
Sprinkles for decoration

{directions}
Place the entire box of thin mint cookies {you could always use these or these if you can’t find Girl Scout cookies in your area!} in a food processor. Pulse until the cookies become completely crumbled. Transfer the crumbled cookies to a large bowl and add the cream cheese. Stir until completely combined. Place wax paper on a baking sheet. Begin to roll the cookie and cream cheese mixture into about 1 to 1 1/2 tablespoon balls. Place on the baking sheet. Repeat with remaining cookie cream cheese mixture. Transfer the baking sheet to the freezer for about 20 minutes. To melt the chocolate: Place all the chocolate in a 13 x 9 glass baking dish {break up the chocolate bar into smaller pieces so they are close to the size of the morsels}. Place the baking dish in the oven and leave the oven door slightly ajar. Cook for approximately 8 minutes, or until completely melted, stirring every 2 minutes to check the consistency. Once the chocolate is completely melted, remove from the oven. Remove the thin mint truffles from the freezer and begin dipping the truffles in the white chocolate {I used one fork to dip the truffle and another fork to remove from the chocolate}. Transfer the truffle back to the baking sheet, adding sprinkles if desired. Repeat with remaining truffles. Once all the truffles are dipped in chocolate and drying on the baking sheet, place the baking sheet back in the freezer to allow the truffles to set for at least 30 minutes. Bring to room temperature before enjoying. 

thin-mint-cookie-ballsst.-patrick's-day-recipes
Thanks for dropping by and have a wonderful Tuesday!

P.S. Be sure to check out the link to my Spring Trends Report on the right sidebar! I’ve been talking about my favorite trends for spring the past few weeks in my weekly newsletter. Check out last week’s here!

Buffalo Chicken Potstickers

buffalo-chicken-potstickers
buffalo-chicken

buffalo-chicken-appetizer

buffalo-chicken-appetizer

buffalo-chicken-wontons

how-to-make-potstickers

wonton-appetizer-recipes

how-to-make-potstickers

homemade-potstickers

how-to-fry-potstickers

how-to-bake-potstickers

buffalo-chicken-potstickers

Happy Tuesday! I’m back to my regular schedule with food recipes, and today it’s all about buffalo chicken potstickers! You may recall that I’m not a huge fan of chicken, but buffalo chicken is one of the only kinds of chicken I can tolerate. Ok, well I guess it’s a little more than tolerable 🙂 You also may remember a few weeks ago I shared a recipe for taco bites using wonton wrappers. For that recipe, I only used about half of the package of wonton wrappers, so I wanted to come up with a way to use the remaining wrappers while they were still fresh!


Enter these Buffalo Chicken Potstickers. I have to confess, I’m not a huge fan of Asian food either {I find it just too salty!} but I do like potstickers. I’ve always wanted to try making them myself because the majority of potstickers found in restaurants, or even worse, the frozen food section, are not only unhealthy, but typically high in sodium. So since I had the leftover wonton wrappers, I decided that this was as good of a time as any to make homemade potstickers! But, I didn’t want to do anything typical, so I went with one of my favorite foods to incorporate into an appetizer: buffalo chicken! It seems like buffalo chicken is such a crowd favorite, it’s really hard to go wrong with it! 

buffalo-chicken-potstickers-appetizer


{what you will need}

About 24 wonton wrappers {half of 12 oz package}
3 cups cooked chicken, shredded
4 ounces low fat cream cheese, at room temperature
1/2 hot cayenne pepper sauce {I used Frank’s}
3-4 green onions, chopped
2 tablespoons vegetable oil
Ranch or Blue Cheese Dressing, for garnish
Water, for assembling potstickers

{directions}
In a large bowl, combine the chicken, cream cheese, hot cayenne pepper sauce and green onions; mix until completely combined. To assemble the potstickers, lay one wonton wrapper on a flat surface. Keep the remaining wrappers in the packaging until you are ready to use them. Brush the edges of the wonton lightly with water and scoop about 1/2 – 1 tablespoon of buffalo chicken mixture into the center of the wrapper. Fold over and seal all the edges, making sure there are no openings. Place on a sheet pan while assembling the rest of the potstickers. Heat the vegetable oil in a large skillet over medium heat. Add the potstickers in a single layer cooking until crisp and golden on each side, about 2-3 minutes. Serve with Ranch or Blue Cheese dressing, if desired. 


Have you every made homemade potstickers? I think it’s safe to say I am hooked…they are so much better than the frozen ones haha! I’m coming up with more “stuffing” ideas, so I will be sure to share them with you!

Have a great Tuesday and see you tomorrow for an all new spring Wednesday Wishes!

Conversation Heart Puppy Cookies

valentines-day-treat-for-dogs


Can you believe Valentine’s Day is already this weekend?! Last week, I shared a sweet treat for all the humans in your life and today, I’m sharing a treat for all the dogs! I love making Ella homemade treats — not only does she seem to enjoy ever bite, but by making them myself, I know all ingredients going into them. We are pretty particular about the kind of food and treats we feed her — besides being crazy puppy parents, she has quite the sensitive stomach. When I found this recipe from Giada De Laurentiis, I thought it definitely had potential! Two of Ella’s favorite cookie ingredients happen to be chicken and peanut butter and although that combination might sound gross {super gross!} to humans, she loves it! I modified this recipe slightly by skipping the Parmesan cheese and cutting the cookies into hearts to recreate the conversation heart Valentine’s Day candy, which is all too appropriate! This recipe made a lot of cookies, so you could easily freeze any leftovers or send some to your dog neighbors!

homemade-dog-cookies

homemade-dog-treat-recipe


Conversation Heart Puppy Cookies

{what you will need}
2 cups whole wheat flour, additional for dusting
1/2 cup old fashioned oats
1 tablespoon baking powder
1 cup low sodium chicken broth
1 cup creamy peanut butter, plus additional 2 tablespoons for frosting

{directions}
Preheat the oven to 375 degrees. Combine the whole wheat flour, old fashioned oats and baking powder in a large bowl. Stir in the chicken broth and peanut butter until a crumbly dough forms. Lightly flour your work surface and knead the dough until smooth. Roll the dough out into a circle, with a thickness of about 1/2 inch. Cut dough into desired shape and place on baking sheet that has been sprayed with vegetable oil or you can also use a silicon baking mat. Bake for about 20 minutes until slightly golden. Allow to cool on the baking sheet for 5 minutes before transferring to a cooling rack. Cool completely before frosting. For the frosting: mix about 2 tablespoons of peanut butter with about 1 teaspoon water {you can play with the consistency by adding more water}. Place the peanut butter mixture in a frosting bag and, using a tiny circle decorating tip, pipe on desired sayings for your conversation hearts!

….

Thanks so much for dropping by and have a great Tuesday!

White Chocolate Valentine’s Day Popcorn

white-chocolate-popcorn-recipe

As I mentioned in yesterday’s post, I had a busy Sunday of recipe post cooking, including this sweet treat! With Valentine’s Day quickly approaching, I wanted to share with you a simple, fun and perfect for any age treat! Popcorn is the ultimate snack food and when mixed with white chocolate, conversation hearts and Valentine’s Day M&M’s, it turns into the sweetest snack ever! 


Growing up, I remember my mom making carmel corn popcorn balls around Christmas and how delicious they were. Although this uses white chocolate instead of carmel, it’s just as sweet, delicious and addicting! This makes for such a cute Valentine’s Day treat for children or even your co-workers, like I did! And the packaging is totally up to you. I used clear treat bags and tied them off with pink ribbon, but you could easily display them in cute cupcake wrappers or use Valentine’s Day themed candy boxes! 


**A few notes: Just a warning, the conversation hearts are considerably harder than the popcorn and M&M’s so be careful when chewing! And if all the popcorn didn’t pop in the microwave, be sure to remove any kernels that are left over before adding the candy and white chocolate 🙂


pink-white-chocolate-popcornvalentine's-day-popcorn-treat


White Chocolate Valentine’s Day Popcorn


{what you will need}
1.5 bags popped popcorn
8 ounces white chocolate baking bar
12 ounces white chocolate morsels
8 ounce bag conversation hearts
11 ounces Valentine’s Day M&Ms
Pink food coloring, if desired

{directions}
Pop the popcorn according to package instructions. Place in large mixing bowl. Once cool, add the conversation hearts and M&Ms. Meanwhile melt the chocolate. You can do this in the microwave or oven. Here are my instructions for the oven: heat the oven to 300 degrees. Place all the chocolate in a 13 x 9 glass baking dish {break up the chocolate bar into smaller pieces so they are close to the size of the morsels}. Place the baking dish in the oven and leave the oven door slightly ajar. Cook for approximately 8 minutes, or until completely melted, stirring every 2 minutes to check the consistency. Once the chocolate is completely melted, remove from the oven and add desired amount of food coloring to tint the chocolate pink; continue to stir until fully incorporated. Add the chocolate to the popcorn and candy mixture and stir with a rubber spatula from the bottom up to make sure the chocolate sticks to all the popcorn and candy. When the chocolate is fully incorporated, place popcorn mixture onto rimmed baking sheets, smoothing into one layer. Allow to dry completely or speed up the process by placing in the freezer. Once dry, break into pieces and package with festive treat bags or candy boxes, if desired. Enjoy…it’s addicting 😉


….

Thanks for stopping by and see you tomorrow!

homemade granola

homemade-granola-recipegranola-recipe
yogurt-and-granola-recipeyogurt-berries-granola-recipe
homemade-yogurt-parfait yogurt-granola-parfait
homemade-granola-yogurt-parfait
Happy Tuesday! I’m continuing the healthy recipes to kick off the new year with this homemade granola today! I don’t know about you, but I love granola anyway I can get it — on top of yogurt, by itself or with a little almond milk to make it like a cereal {I’ve been doing this for the past week and it’s delicious!}

Often, I find myself looking at all the brands of granola at the grocery store and being so tempted by all of them! But, I have found, that the store-bought granola is not always the healthiest. That’s why I love this recipe: you know everything that’s going into it and you can really customize it with your favorite ingredients. And trust me, I have thought plenty of times about making homemade granola but end up deciding I just don’t have the time. How silly! This was such a quick and simple recipe, that should never be an excuse! And it made so much that you will have a few weeks worth in just one recipe!

My mom had granola at a family bridal shower a few months ago and has been raving about it sense! When we made this granola the other weekend, we decided to add the dried fruit for a little spin and it was so delicious! We went with dried cherries because we had them on hand, but you could easily use any other dried fruit you like — dried cranberries would be fabulous too! 


Homemade Granola


{what you will need}

4 cups oats {regular or quick}
2 cups shredded coconut
2 cups sliced almonds
3/4 cup vegetable oil
1/2 cup honey
1 cup whole dried cherries, chopped


{directions}
Preheat the oven to 350 degrees. Mix the honey and oil together in a small bowl. In a separate, larger bowl, mix together all the dry ingredients and pour the honey and oil mixture over it. Mix until completely incorporated. Spread the mixture out onto an oiled, rimmed cookie sheet and bake for 35 minutes. Stir every 15 minutes. Allow to cool before adding the dried cherries, or other favorite dried fruit. 

healthy-homemade-granola-recipe
Thanks so much for dropping by and see you tomorrow!

Super Bowl Appetizer: Wonton Taco Bites

wonton-appetizer-recipes

taco-bites-appetizer

bite-sized-appetizers

super-bowl-appetizer-ideas

wonton-taco-appetizer
taco-wonton-recipebite-sized-taco-appetizer

mexican-appetizer-ideastaco-appetizer

wonton-taco-bites

With the NFL wild card round games in the books, it’s just about time to start preparing for a Super Bowl party! As some of you may know, we are lifelong and die-hard Steelers fans. The last time the Steelers were in the Super Bowl {2011 against Green Bay} I missed at least half of the game and was not too happy about it! At the time, I was in a small apartment, with an even smaller kitchen, trying to get appetizers out of the oven and onto the table and lost complete track of time. Whether the small workspace or the complicated recipes I chose were to blame, I’ve definitely learned my lesson: quick, simple, and/or make-ahead recipes are always best, especially when you want to actually watch the game! Regardless of whether the Steelers make it to the Super Bowl this year, I will be sure to not miss the game with this quick and tasty recipe!

As with so many of my dishes, I love using flexible ingredients that allow you to customize with what you like best. There are so many possibilities when it comes to toppings for these taco bites — basically whatever you like in your burrito or on your taco will work!  

wonton-taco-bites

Wonton Taco Bites

{what you will need}
24 wonton wrappers
1 pound lean ground beef, cooked & drained
1 package taco seasoning {I used low sodium}
3/4 cup water
1/2 cup shredded Mexican cheese
1/2 cup pico de gallo
1/3 cup shredded lettuce
1/2 cup guacamole

{directions}
Preheat the oven to 350 degrees. In a large skillet over medium heat, brown the ground beef until no longer pink; drain. Add the taco seasoning and water to the ground beef and stir until fully cooked; set aside. Meanwhile, place the wonton wrappers in a mini cupcake tin and cook for 5 minutes. Remove from the oven and add about 1 tablespoon of the ground beef to each wonton wrapper and top with 1-2 teaspoons of cheese {depending on how much cheese you like!}. Place the taco bites back in the oven and cook for an additional 10 minutes, or just until the wrappers begin to become golden brown. Remove from the oven and allow them to cool for 5 minutes. Top the taco bites with pico de gallo, shredded lettuce, guacamole and any other toppings you desire. Serve and enjoy!

….
What are your plans for the big game? After watching the Steelers in a public place on Saturday, I realized it’s probably better for us to watch the rest of their games from our house. I get way too crazy to be seen in public haha! 

Thanks for stopping by and have a fabulous Tuesday!